MeasureBox GSM Datalogger
  • Home
  • Products
    • Measurebox Gsm Datalogger
    • TemplogGO
    • PDF Datalogger
    • TemplogONE
    • TemplogJR
    • GSM Data Logger – GNT802
    • Ethylene Absorve Machine
    • Temperature – Humidity Carbon Dioxide Ethylene Transmitter
    • Monitoring System For Cold Storage Rooms
  • Contact
  • Query the Device
  • Links
    • templogone.net
    • temploggo.com
  • TR
  • Ara
  • Menu

MeasureBox GSM Temperature, HumIdIty, LIght and Impact Datalogger

Technicial Specifications

Temperature measurement Range-25C / +65C
Temperature sensitivity0,5 C
Temperature resolution0,1 C
Light SensorYes
Impact SensorYes
ScreenOLED
Recording options30 and 60 Days
Recording Range30 Day: in every 15 min / 60 Day: in every 30 min
Registration Submission30 days: in every 30 minutes/60 days: 1 per hour
Internal SIM cardYes
GSM850 / 900 / 1800 / 1900
Battery Rechargeable Lithium Ion Battery
IP ClassIP67
Tracking optionsAndroid / IOS Applications and Instant tracking via the WEB
Adjustable ALARMUser-adjustable Bottom and top alarm
ALARM NotificationsInstant notification through WEB and mobile apps.
Route trackingUser-generated Route.
Report OptionsPdf / Graphical / Table
Automatic report sendingUser-configurable Automatic Reporting

MeasureBox

MeasureBox GSM datalogger device is equipped with multi-sensor support.
It can measure and record Temperature, Humidity, Light intensity and Impact measurements with the right time and with precision.
Thanks to the GSM technology used, the alarm situations that occur during the shipment are transmitted to the users in real time with application. All recorded data can be accessed via mobile application and web.
MeasureBox dataloggers have two main models, with and without display.
These models are in,
*Temperature
*Temperature + Humidity
*Temperature + Humidity + Light Sensor + Impact Sensoris
diversified.

Thanks to the Oled screen used in the model with a screen, it is easy to read even in dark environments, and alarm conditions can be easily checked on the screen when necessary without the need for an additional application.

To monitor the shipping location and temperature information, enter our site www.dataloggercenter.com then
enter your device serial number in the correspondence box.

You can also track the route and temperature quickly and easily by using the TemplogGO application that can be downloaded from your mobile phone .

When the specified alarm values are exceeded, the user is warned via the Web and/or Mobile app via instant Notifications.
With the “Reached Target Destination ” feature, you’ll be notified instantly via mobile app when you reach your designated destination before shipment You can also have the entire shipping report automatically sent to your email address that you have defined on the Device.

Available in 180 countries with built-in SIM Card. Click for Country List

Instant Mobile and Web notifications

Click to query the device

Click for Android App

Click for Ios/Iphone App

Ease of Use

It is extremely easy to start the registration process and report the Recording.

Cloud storage

All device data is stored in a secure cloud environment

Create a user

Users can be identified by creating a user-specific device through the System.

7/24 Access

You can access all device data from anywhere in the 7/24.

CalIbratIon CertIfIcate

Each device has a special calibration certificate and can be downloaded via the system.

HIgh SecurIty

The data inside the device cannot be altered by external interference.

Instant Alerts

Alarm states are forwarded to the user with push notifications.

Advanced reportIng

PDF, Excel, Graphical and Table format can be reporting in the desired date Range.

7/24 Easy access and reporting from all devices.

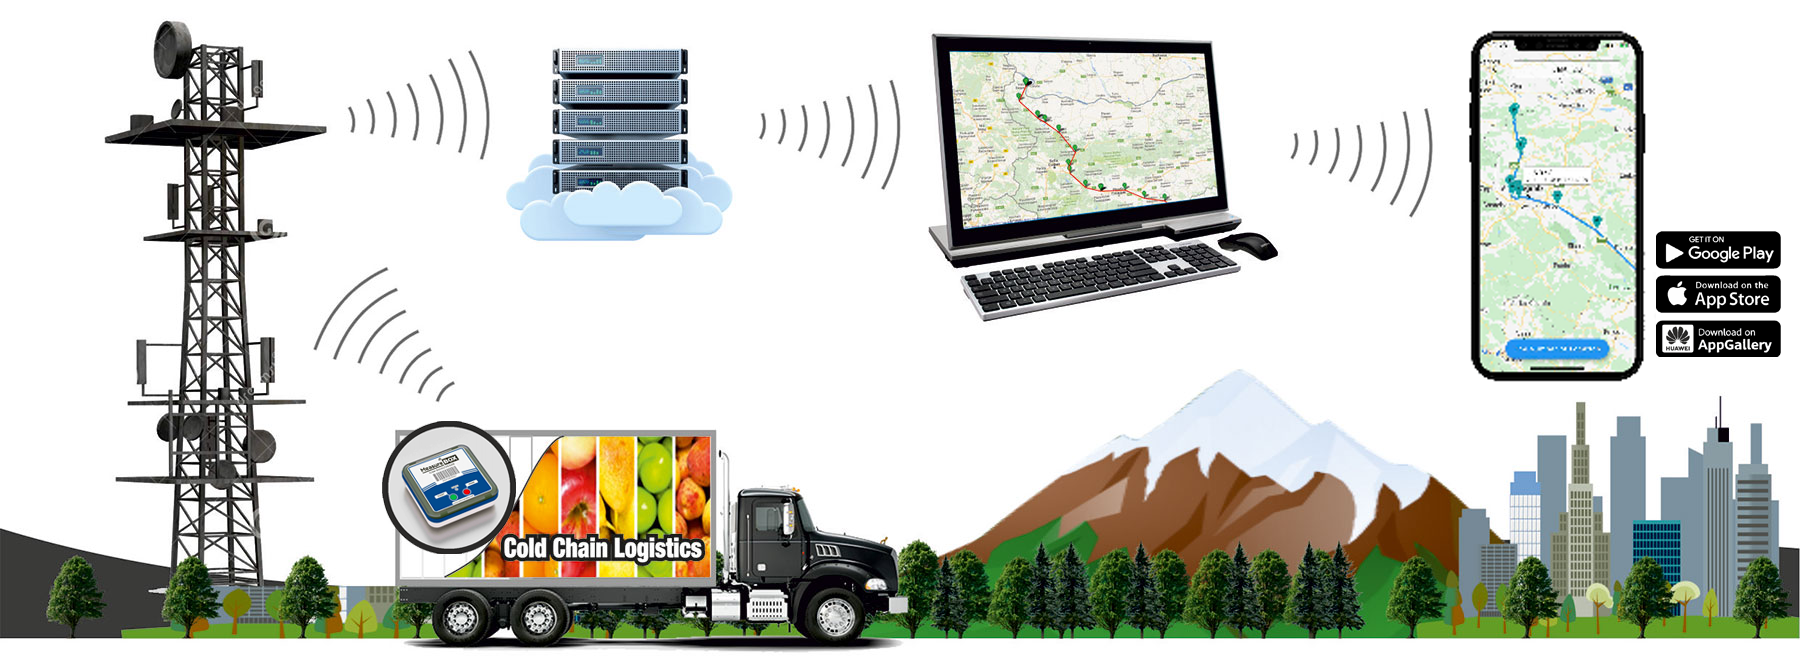
How does It work?

1
2
3
4
1

TemplogGO Instantly transfers the temperature value and location information to the cloud storage center using the GSM infrastructure.

2

The data transferred to the High-security Cloud storage Center is processed here and made available for transmission to Users.
* The storage process uses the Microsoft Azure infrastructure.

3

Users with a computer connected to the Internet from www.temploggo.com page, can track anytime 7/24, temperature and location data by entering the device number in the corresponding box.

4

The entire process can be monitored via mobile application at 7/24. In any alarm situation, the user is notified instantly with instant Notifications.

Warning: MeasureBox uses the GSM infrastructure for data and location Transmission. Instant distress may occur when submitting data and location information according to geographical and weather conditions, the device will continue to register in these cases and when it receives the GSM signal again, it will send all data lossless to the CLOUD.
 

How to use.?

START TO REGISTRATION PROCESS

To start the datalogging process, press and hold the Start button on the device until the red status LED lights up. When the red status led lights up, the recording process will start.

Reviewing Saved Data

To access the data of the device that worked, please login to www.temploggo.com from the browser you are Using.

On the opening page, click the GO button by typing the barcode number in the device number field on the bottom of the Device.

The final position of the device and the screen with the instantaneous temperature values will be seen.

To access the Device’s past location and temperature data, Right-click on the tool on the map and in the window that opens GO to History Button.

This process can also be done with the History button under the Tracking tab on the top left.

The device number will automatically be selected on the page that appears. Clicking on the GO button will open the screen where the Device’s history records are Located. Optionally, You can customize the history records by selecting only a specific date range on the same page or by filtering the last 10, 100, 1000 records.

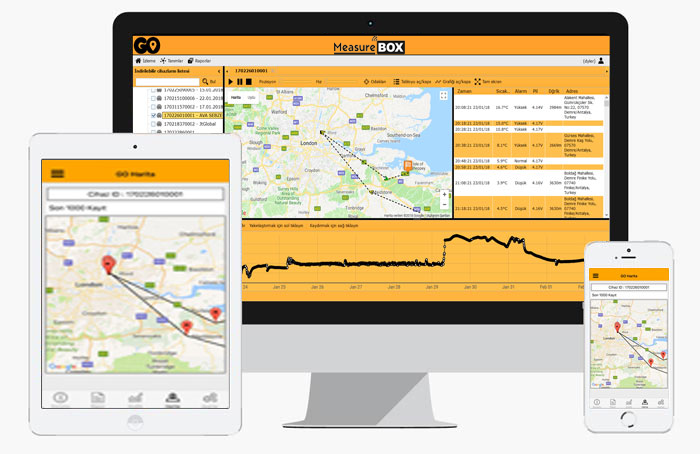
PAST records Screen

The past records screen generally consists of 3 parts.

Map screen

This section displays the entire route that the device follows.

The + and – buttons on the bottom right can be zoomed in and out.

Click on the OK icon at the zoom point to find information about the location of the device and the temperature values.

The map can be viewed as full screen on the PC screen by clicking on the square icon in the top right.

The map and satellite buttons on the top left can be switched between satellite or map Views.

Display as a List

On the list screen, all the records the device receives are shown as a List.

Graphic display

All recordings are displayed graphically on this Screen.

You can zoom in on the graph by selecting it with the left mouse button and Scanning.

Each circle on the chart represents the time that the record was received, and the current temperature and date information is displayed when clicked On. It also shows the location on the map.

Reporting past records

To report the Device’s past location and temperature data, Right-click on the tool of the map and in the opening window GO to Report Button.

This operation is located at the top left Reports tab under Report Button.

The device number will automatically be selected on the page that appears

Reports can be created in PDF, Graphics, Tables, and Excel Formats.
You can also optionally add names and notes to your report and customize your report by selecting the desired time Range.

When you click GO button, the device report will automatically be downloaded to your computer.

Calibration Certificate

Each device has a special calibration Certificate.
To download the calibration document, Right-click on the tool on the map and click the Calibration Certificate button in the opening window.

The calibration document will automatically be downloaded to your computer.

User creation and its benefits

www.temploggo.com allows you to create a username and easily monitor your devices by signing in with this User.

Creating users allows you to track multiple devices on the same screen, group them into your alarm identification, and get the device to the user by instantaneous alerts.


To create a user www.dataloggercenter.com Login to the Site.

Click the Register tab to complete the form and click the GO button.

After registration you can login with your email address and password by selecting the USER tab.

Add a device to your account (must be logged in)

The first time you sign in, you need to add a device to your Account.

Type your device number in the # 1 field on the top left and click the ADD button. You can add as many devices as you need.

After adding a device, Click the Save button in area 2 to complete the registration PROCESS.

You can access the Add Device page at any time by clicking the Devices/GROUPS button at the top left of the Definitions tab.

The next time when you add a device to your account, all your devices will appear on one screen as follows.

Delete a device from your account (must be logged in)

To delete a device registered to your account Click the Devices/GROUPS button at the top left of the Definitions tab.

Click on the device you want to delete and click REMOVE button, then click SAVE to terminate the Process. Warning: you need to know the device number to add the device again, the deleted device cannot be restored again if you don’t know the number.

Create groups and add devices to the groups (must be logged in)

Click the Devices/GROUPS button at the top left of the Definitions tab.

On the opening page, type the group name you want to create in field 1 and press CREATE button.
You can create as many groups as you wish.

Then click the SAVE button to complete the group creation Process.

Adding a device to the created groups, drag and drop the device you want to add to the left of the screen to immerse it in the group you Created.

You can add as many devices to groups as you want, at the end of the process, click the SAVE button at the top left to complete the ADD process.

ALARM and NAME identification on device (must be logged in)

You can define and name the desired alarm values for the devices you add to your Account.
Click the SETTINGS button under the Definitions tab at the top left.

Cihaz liste ekranı açılacaktır

Open the Setup window by double-clicking on the device you want to change settings for.

The adjustment Change window consists of 6 different tabs
The General tab contains information about the Device.

Shipping tab: You can name the device in this FIELD. The name you provide will be displayed easily monitoring the device on the home Screen.

Sender tab: This field can be written to the sender information by Request.

Carrier tab: This field can be written to the carrier information by Request.

Recipient tab: This field can be written according to the optional recipient Information.

Product Information Tab: The product information that is shipped can be written to this field.
You can also enter the minimum and maximum temperature alarm values that you want to be adjusted from this tab in the alarm values.

After the necessary changes are made, you can complete the process by clicking the SAVE button on the top left.

Device Alerts (instant Notification) To activate. (must be logged in)

To receive instant notifications over a computer, you must also subscribe to notifications by clicking the RING icon at the bottom right of the home Screen.

You receive instant notification in the following situations.
*When the low-temperature alarm goes into position
*When the high temperature alarm goes into position
*When the Alarm goes out (when the temperature returns to Normal)
*When a device that has not started STARTS
*When the device reaches a designated target or any control point on the road
Note: if your Android or iOS app is installed and signed in with your username, notifications are instantly forwarded to your PHONE.

Create a route and destination. (must be logged In)

By creating a pre-arrival and checkpoints, you will receive instant notification when the device reaches these points and you can find out the estimated time of arrival.

Click the ROUTE button at the bottom of the left Top tab to open the Create route Page.

To open the Create a route page, click the route button under the top left-hand tab.

For example, lets imagine that we have a Route starting from Istanbul will also end Budapest, Berlin, Paris and Madrid.
On the opening page, search in the top left by typing Istanbul that is the starting point.

The search will show a map of the city center of Istanbul. You can magnicide the map with the middle key of the mouse or the + and – symbols located at the bottom right.

Select a starting point by clicking the left mouse button at the starting point of the route you have specified.

For the second destination point write Budapest inside the Search the box.

Create second destination point by clicking on the location you Wish.

  1. Search for the destination by typing in the box in Berlin and specify the destination point by clicking the desired area.

To identify 4. destination by typing Paris into the SEARCH box and by clicking desired area specify the 4. destination Point.

By typing Madrid into the SEARCH box identify the last destination and click on desired area on Map to identify final  Location

By default, each added point determine 5000mt/radius circle area, to shrink or enlarge this diameter, you can magnify or shrink the fields shown by the number 1 arrow on the four sides of the circle using the Mouse.
You can move the area you want with the mouse by using the field shown with arrow 2 to change the location of the field you have Selected.
Click the undo icon shown with Arrow 3 to undo the Action.
To completely erase the destination point, click the right mouse button to enter the field shown by Arrow2.

When the map is enlarged, it will be seen as follows.
To name the selected points, click on the point where you want to name, and then type the desired name in the field indicated by arrow number 1 on the Right. You can do this separately for each point. The names given to the points will also be displayed to the User.

When all transactions are finished, click the SAVE button shown with arrow number 3 by typing a name for your route in the field shown by Arrow 2.

The specified route will be created as Follows.
You can add and edit any number of Routes.

Identifying the route to the device

To define a pre-set route to the device, right-click the device on the home screen to add a route on the map, then press the tab DEFINE SHIPMENT Button.

In the window that opens, fill in all fields according to the request if there is a special start date, the device will calculate the route on the specified Date. If left blank, the shipment is counted in the first position it first received.

Click the GO button by selecting the route previously created from the route Section.

When the device that has been defined for shipment (Route) is clicked on the home screen, data such as estimated arrival time and remaining km are SHOWN.

FAQ: Frequently Asked Questions / Errors and Solutions

How to send data when the device is on a ship or in a plane?

Ship and aircraft shipments with the device cannot be connected to base stations so it can not send instantaneous Data. During this time, the device keeps the records in its memory by continuing the temperature measurement.

At the end of the shipment, when it reaches the port or airport, it connects to the base station and sends the data in its memory that has been collected on the route.

What is the expiration date of the device?

The device has no expiration date, you can run it when you need it.

Note:  For devices that remain in stock for a long time are advised to insert charging 2 hours before running to avoid battery problems.

The device was purchased more than 4 months, is the battery finished?

Devices that remain in stock for a long time may have a battery discharge. You can use the device with a Micro USB charger for at least 2 Hours.

Is there a SIM card in the device?

Yes. The device is sold with a SIM card, User does not need to insert a SIM card. The SIM card within the device is ready for use in 180 countries.

What is it for the barcode on the back of the device?

The barcode on the back of the device is the specific serial number of the device itself. This number will be used for monitoring information by typing it via the www.temploggo.com site or mobile Application.

Share this page...
  • Share on Facebook
  • Share on Twitter
  • Google+ üzerinden paylaş
  • Share on Pinterest
  • Share on Linkedin
  • Share on Tumblr
  • Share on Vk
  • Share on Reddit
  • Mail üzerinden paylaş

Gentek Elektronik San. ve Tic. A.Ş.

Address

Şerifali Mah. Barbaros Cad. No:60 Ümraniye İstanbul / TURKIYE

Contact

+90 216 599 01 23
info@gentekelektronik.com.tr
sales@gentekelektronik.com.tr
Sayfanın başına dön
Open chat
Powered by Join.chat
Hello. Can we help you.?